NI Compuτe: Subnet Miner Setup
1. INTRODUCTION
Section titled “1. INTRODUCTION”For miners interested in joining this innovative network, Subnet 27 offers the opportunity to contribute computing resources and earn $NI in return. This guide is structured to provide a comprehensive breakdown of how you can get started with contributing to Bittensor’s commodity markets using your compute power.
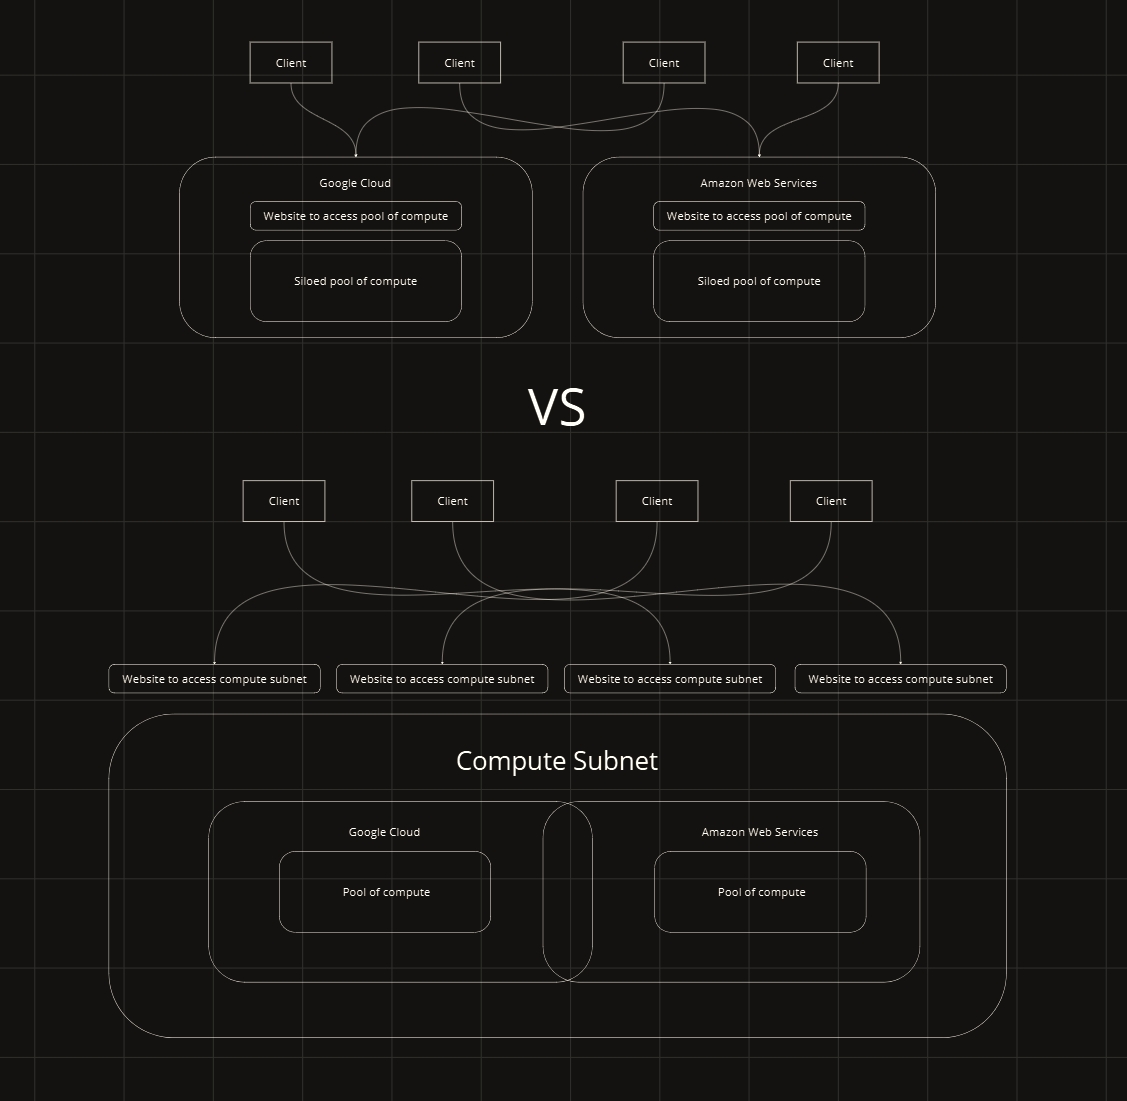
Decentralizing Compute
Section titled “Decentralizing Compute”NI Compute decentralizes computing resources by combining siloed pools of compute on a blockchain to be validated and accessed trustlessly. This opens a door to scalable compute without the constraints of centralized power.
Subnetwork 27
Powered By Bittensor
Section titled “Powered By Bittensor”NI Compute brings, arguably, the most important and finite resource needed for the creation of machine intelligence. All network participants will have access to an ever-expanding pool of compute for all development needs.
What is a decentralized supercomputer without access to permissionless compute?

Subnetwork 27
Miner Overview:
Section titled “Miner Overview:”Miners contribute processing resources, notably GPU (Graphics Processing Unit) instances.
Performance-Based Mining: The system operates on a performance-based reward mechanism, where miners are incentivized through a dynamic reward structure correlated to the processing capability of their hardware. High-performance devices are eligible for increased compensation, reflecting their greater contribution to the network’s computational throughput. Emphasizing the integration of GPU instances is critical due to their superior computational power, particularly in tasks regarding machine learning.

Rent A Server From Subnet 27: https://app.neuralinternet.ai/
Compute Subnet Github: https://github.com/neuralinternet/compute-subnet
Compute Subnet Discord Channel: https://discord.gg/t7BMee4w
Real-Time Compute Subnet Metrics: https://opencompute.streamlit.app/
We greatly appreciate and encourage contributions from the community to help improve and advance the development of the Compute Subnet. We have an active bounty program in place to incentivize and reward valuable contributions.
If you are interested in contributing to the Compute Subnet, please review ourReward Program for Valuable Contributions document on GitHub. This document outlines the details of the bounty program, including the types of contributions eligible for rewards and the reward structure.
Reward Program for Valuable Contributions: https://github.com/neuralinternet/compute-subnet/blob/main/CONTRIBUTING.md
Validator CLI Guide For Reserving Compute Subnet Resources: Validator Utilization of Compute Resources
Example Cloud Providers:
Section titled “Example Cloud Providers:”We do not support Containerized (docker)-based cloud platforms such as Runpod, VastAI and Lambda.
We strongly urge miners to provide their own hardware to foster and build a stronger network for all. Providing your own in-house hardware may come with its own benefits.
If you cannot supply your hardware in-house, here are some usable GPU providers:
- Oracle
- Coreweave
- FluidStack
- Latitude.sh (referral code: BITTENSOR27)
- Oblivus (referral code: BITTENSOR27 - 2% cash back in platform expenditures)
Examples of GPUs to rent (listed in order of computing power):
GPU Base Scores: The following GPUs are assigned specific base scores, reflecting their relative performance. To understand scoring please see the Proof-of-GPU page here:
- NVIDIA H200: 4.00
- NVIDIA H100 80GB HBM3: 3.30
- NVIDIA H100 80GB PCIE: 2.80
- NVIDIA A100-SXM4-80GB: 1.90
2. INSTALLATION
Section titled “2. INSTALLATION”This installation process requires Ubuntu 22.04 and python3.8 or higher. You are limited to one external IP per UID. There is automatic blacklisting in place if validators detect anomalous behavior. Port 4444 is to be opened for your miner to function properly.
Install Docker
Section titled “Install Docker”To run a miner, you must install Docker and run the service. If Docker is already installed on your machine, scroll down to step 2.1
Install Link: https://docs.docker.com/engine/install/ubuntu/#install-using-the-repository
Verify that the Docker Engine installation is successful by running the hello-world image.
This command downloads a test image and runs it in a container. When the container runs, it prints a confirmation message and exits.
Copy
sudo docker run hello-world2.1 BEGIN BY INSTALLING BITTENSOR:
Section titled “2.1 BEGIN BY INSTALLING BITTENSOR:”Copy
/bin/bash -c "$(curl -fsSL https://raw.githubusercontent.com/opentensor/bittensor/master/scripts/install.sh)"See Bittensor’s documentation for alternative installation instructions.
Bittensor Documentation: docs.bittensor.com
2.2 VERIFY THE INSTALLATION:
Section titled “2.2 VERIFY THE INSTALLATION:”Verify using the btcli command
Copy
btcli --helpIf this does not result in the expected output try adding python to path using: export PATH=$PATH:$(python3 -m site --user-base)/bin
which will give you an output similar to below:
Copy
usage: btcli <command> <command args>
bittensor cli v6.9.4
positional arguments:  {subnets,s,subnet,root,r,roots,wallet,w,wallets,stake,st,stakes,sudo,su,sudos,legacy,l,info,i}    subnets (s, subnet)                        Commands for managing and viewing subnetworks.    root (r, roots)     Commands for managing and viewing the root network.    wallet (w, wallets)                        Commands for managing and viewing wallets.    stake (st, stakes)  Commands for staking and removing stake from hotkey accounts.    sudo (su, sudos)    Commands for subnet management    legacy (l)          Miscellaneous commands.    info (i)            Instructions for enabling autocompletion for the CLI.
options:  -h, --help            show this help message and exit  --print-completion {bash,zsh,tcsh}                        Print shell tab completion script
Create a Cold & Hotkey with the commands below:
Follow the instruction following both of these commands
Copy
btcli w new_coldkeyCopy
btcli w new_hotkeyIf you already have a Key, you can regenerate it ‘safely’ on a machine using btcli w regen_coldkeypub. However, you must regen the full key if you plan to register or transfer from that wallet. regen_coldkeypub lets you load the key without exposing your mnemonic to the server. If you want to, you can generate a key pair on a local safe machine to use as cold storage for the funds that you send.
Copy
btcli w regen_coldkeypubCopy
btcli w regen_coldkeyCopy
btcli w regen_hotkey4. CLONE COMPUTE-SUBNET
Section titled “4. CLONE COMPUTE-SUBNET”Copy
git clone https://github.com/neuralinternet/Compute-Subnet.gitAccess the Compute-Subnet Directory
Copy
cd Compute-Subnet5. COMPUTE SUBNET DEPENDENCIES
Section titled “5. COMPUTE SUBNET DEPENDENCIES”For optimal functionality of the Compute Subnet, it’s essential to install the appropriate graphics drivers and dependencies.
Required dependencies for validators and miners:
Copy
python3 -m pip install -r requirements.txtpython3 -m pip install --no-deps -r requirements-compute.txtpython3 -m pip install -e .5.1 EXTRA DEPENDENCIES FOR MINERS:
Section titled “5.1 EXTRA DEPENDENCIES FOR MINERS:”In case you have missing requirements
Section titled “In case you have missing requirements”Copy
sudo apt -y install ocl-icd-libopencl1 pocl-opencl-icdDownload the NVIDIA CUDA Toolkit
Section titled “Download the NVIDIA CUDA Toolkit”To ensure optimal performance and compatibility, it is strongly recommended to install the latest available CUDA version from NVIDIA.
If Nvidia toolkit and drivers are already installed on your machine, scroll down to verify then move on to the Wandb Setup.
Copy
# Visit NVIDIA's official CUDA download page to get the latest version:# https://developer.nvidia.com/cuda-downloads
# Select your operating system, architecture, distribution, and version to get the appropriate installer.
# Example for Ubuntu 22.04 (replace with the latest version as needed):
# Download the CUDA repository package (update the URL to the latest version)

wget https://developer.download.nvidia.com/compute/cuda/12.3.1/local_installers/cuda-repo-ubuntu2204-12-3-local_12.3.1-545.23.08-1_amd64.deb
Copy
sudo dpkg -i cuda-repo-ubuntu2204-12-3-local_12.3.1-545.23.08-1_amd64.debCopy
sudo cp /var/cuda-repo-ubuntu2204-12-3-local/cuda-*-keyring.gpg /usr/share/keyrings/Copy
sudo apt-get updateCopy
sudo apt-get -y install cuda-toolkit-12-3Copy
sudo apt-get -y install -y cuda-driversCopy
export CUDA_VERSION=cuda-12.3export PATH=$PATH:/usr/local/$CUDA_VERSION/binexport LD_LIBRARY_PATH=/usr/local/$CUDA_VERSION/lib64Copy
echo "">>~/.bashrcecho "PATH=$PATH">>~/.bashrcecho "LD_LIBRARY_PATH=$LD_LIBRARY_PATH">>~/.bashrcCopy
source ~/.bashrcYou may need to reboot the machine at this point to finalize changes
Copy
sudo rebootThe simplest way to check the installed CUDA version is by using the NVIDIA CUDA Compiler (nvcc).
Copy
nvidia-sminvcc --versionThe output of which should look something like
Copy
+---------------------------------------------------------------------------------------+| NVIDIA-SMI 545.29.06              Driver Version: 545.29.06    CUDA Version: 12.3     ||-----------------------------------------+----------------------+----------------------+| GPU  Name                 Persistence-M | Bus-Id        Disp.A | Volatile Uncorr. ECC || Fan  Temp   Perf          Pwr:Usage/Cap |         Memory-Usage | GPU-Util  Compute M. ||                                         |                      |               MIG M. ||=========================================+======================+======================||   0  NVIDIA RTX                     Off | 00000000:05:00.0 Off |                  Off || 30%   34C    P0              70W / 300W |  400MiB / 4914000MiB |      4%      Default ||                                         |                      |                  N/A |+-----------------------------------------+----------------------+----------------------+
+---------------------------------------------------------------------------------------+| Processes:                                                                            ||  GPU   GI   CI        PID   Type   Process name                            GPU Memory ||        ID   ID                                                             Usage      ||=======================================================================================||  No running processes found                                                           |+---------------------------------------------------------------------------------------+
Copy
nvcc: NVIDIA (R) Cuda compiler driverCopyright (c) 2005-2023 NVIDIA CorporationBuilt on Fri_Nov__3_17:16:49_PDT_2023Cuda compilation tools, release 12.3, V12.3.103Build cuda_12.3.r12.3/compiler.33492891_0Wandb Setup
Section titled “Wandb Setup”To log into the wandb project named opencompute from neuralinternet, miners and validators need a wandb API key. This is necessary for your miner to be properly scored. You can obtain a free API key by making an account here: https://wandb.ai/
Inside of the Compute-Subnet directory; Rename the .env.example file to .env and replace the placeholder with your actual API key.
You can now track your mining and validation statistics on Wandb. For access, visit: https://wandb.ai/neuralinternet/opencompute. To view the networks overall statistics check out our real-time dashboard here: https://opencompute.streamlit.app/
PM2 Installation
Section titled “PM2 Installation”Install and run pm2 commands to keep your miner online at all times.
Copy
sudo apt updateCopy
sudo apt install npmCopy
sudo npm install pm2 -gConfirm pm2 is installed and running correctly
Copy
pm2 ls5.2 INSTALL NVIDIA DOCKER SUPPORT
Section titled “5.2 INSTALL NVIDIA DOCKER SUPPORT”For more information, refer to the NVIDIA Container Toolkit installation guide: https://docs.nvidia.com/datacenter/cloud-native/container-toolkit/latest/install-guide.html#installing-with-apt
Copy
distribution=$(. /etc/os-release;echo $ID$VERSION_ID)Copy
curl -s -L https://nvidia.github.io/nvidia-docker/gpgkey | sudo apt-key add -Copy
curl -s -L https://nvidia.github.io/nvidia-docker/$distribution/nvidia-docker.list | sudo tee /etc/apt/sources.list.d/nvidia-docker.listCopy
sudo apt updateCopy
sudo apt-get install -y nvidia-container-toolkitCopy
sudo apt install -y nvidia-docker26. START THE DOCKER SERVICE IN COMPUTE SUBNET
Section titled “6. START THE DOCKER SERVICE IN COMPUTE SUBNET”Copy
cd Compute-SubnetCopy
sudo groupadd dockerCopy
sudo usermod -aG docker $USERCopy
sudo systemctl start dockerCopy
sudo apt install atMake sure to check that docker is properly installed and running correctly:
Copy
sudo service docker statusThis is an example of it running correctly:
Copy
root@merciful-bored-zephyr-fin-01:~# sudo service docker status● docker.service - Docker Application Container Engine Loaded: loaded (/lib/systemd/system/docker.service; enabled; vendor preset> Active: active (running)7.0 SETTING UP A MINER
Section titled “7.0 SETTING UP A MINER”Hotkey Registration
Section titled “Hotkey Registration”At this point, you will need some $TAO in your coldkey address for miner registration. Once your coldkey is funded, run the command below to register your hotkey:
Copy
btcli s register --subtensor.network finney --netuid 27For testnet use: btcli s register --subtensor.network test --netuid 15
If you get the error ‘too many registrations this interval’ it means the max amount of registrations that cycle has been reached, and you need to wait a bit and try again. You can check the registration cost here
7.1 SETTING UP UFW FOR MINER:
Section titled “7.1 SETTING UP UFW FOR MINER:”Open your desired ssh port for allocations; default is 4444 (required for allocation):
Copy
sudo apt updateCopy
sudo apt install ufwBelow we open the allocation SSH port
Copy
sudo ufw allow 4444TCP Ports: Open ports using ufw (put any number in place of xxxx and yyyy of your choice) and use them as axon port.
Copy
sudo ufw allow xxxx:yyyy/tcpCopy
sudo ufw allow 22/tcpCopy
sudo ufw enableCopy
sudo ufw status7.2 RUNNING THE MINER:
Section titled “7.2 RUNNING THE MINER:”Miner options
Section titled “Miner options”--miner.whitelist.not.enough.stake: (Optional) Whitelist the validators without enough stake. Default: False.--miner.whitelist.not.updated: (Optional) Whitelist validators not using the last version of the code. Default: False.--miner.whitelist.updated.threshold: (Optional) Total quorum before starting the whitelist. Default: 60. (%)
Now, using pm2, run miner as:
Section titled “Now, using pm2, run miner as:”Copy
pm2 start ./neurons/miner.py --name MINER --interpreter python3 -- --netuid 27 --subtensor.network finney --wallet.name COLDKEYNAME --wallet.hotkey HOTKEYNAME --axon.port XXXX --axon.ip xx.xxx.xxx.xx --logging.debugSubVortex subtensor (recommended):
Section titled “SubVortex subtensor (recommended):”Copy
pm2 start ./neurons/miner.py --name MINER --interpreter python3 -- --netuid 27 --subtensor.network subvortex.info:9944 --wallet.name COLDKEYNAME --wallet.hotkey HOTKEYNAME --axon.port xxxx --logging.debugTo set up your miner, first replace COLDKEYNAME & HOTKEYNAME with the names of your keys. Then, update axon.portwith a 4-digit number in the range you opened for xxxx:yyyy above. For the parameters --axon.external and --axon.ip, use your miner machine’s public IP address in place of the ‘xxxxx’s. You can find this IP by running hostname -I. Though not always necessary, these parameters can be crucial for resolving certain connectivity issues.
When operating a miner and you have local subtensor running on a separate machine, it’s crucial to add and adjust the --subtensor.chain_endpoint parameter. This should be set to the IP and port (XXX.XX.XXX.XXX:XXXX) where your subtensor is running. If your subtensor is local to the miner machine, this parameter can be removed.
8. CHECKING MINER LOGS
Section titled “8. CHECKING MINER LOGS”After launching the compute miner, you can then check the logs using the two commands below:
Copy
pm2 logsCopy
pm2 monitRun pm2 logs to debug any issues and view information on your miner. Specifically find your wandb run to view more live information. In the wandb project you can view the scores you receive from validators.

pm2 miner logs

You can view your scores through the wandb run of a Validator

Expand the stats section

Find your miner UID
10. MORE USEFUL COMMANDS
Section titled “10. MORE USEFUL COMMANDS”Copy
btcli s metagraph --netuid 27Copy
btcli s listCopy
btcli wallet overview --subtensor.network finney --all --netuid 27Copy
pm2 logs miner --lines 1000 | grep -i "Challenge.*found"Copy
pm2 logs -f | grep -E "SUCCESS|INFO|DEBUG|ERROR"Copy
nvidia-smi --query-gpu=name,memory.total,clocks.gr,clocks.mem --format=csvgrep "Challenge .* found in" "/home/ubuntu/.pm2/logs/MINER-out.log" | sed -E 's/.* found in ([0-9.]+) seconds.*/\\1/' | awk '{sum+=$1; count+=1} END {if (count > 0) print sum/count; else print "No data to calculate average"}’Copy
btcli w transfer --subtensor.network local --dest DESTINATION_WALLET --wallet.name default --amount 0Copy
btcli stake remove --subtensor.network local --all --all_hotkeys --wallet.name default